
A Peek into Baby's Room
October 18th, 2010
October 18th, 2010
When I found out I was preggo for the second time around, I am not going to lie, I had PINK on the brain. I already had the name and the room colors picked out. When my hubby and I heard, "It's A Boy!" I was shocked to say the least. I am such a girly girl and my daughter is following closely in my footsteps. I was not sure how I would be able to transition my fog of pink into shades of blue?? Once the shock was over the excitement definitely began!!
 I wanted a room for my little boy that he would be able to grow into for years to come. My hubby and his family are very involved in the sport of Hillclimbing and dirtbike riding, so I wanted a touch of him and a touch of me incorporated in the room. I decided the room was shaping into "Vintage motorcycle meets Pottery Barn simplicity". I cannot tell you how many days and nights I spent on the Internet looking for ideas of inspiration. Some of the sites I loved looking at were Project Nursery, Pottery Barn Kids, and HGTV. I also found this amazing site called DecorPad, which is where I found the wall inspiration you see in the above pictures. I loved the unique color combo of oranges and browns, so I ran with it! I then turned to ETSY to have the crib bedding made to coordinate with the colors of the room. I found the very talented Wild Honey Pie Custom Designs to make the bedding from, Riley Blake My Minds Eye Orange All Star Collection.
I was at Lowes looking for storage containers one day and came across these orange plastic stack able shelves (for $15!!). I originally wanted a window seat for the room made from wood. When I brought them home it was Bri's genius idea to lay them out horizontally and make a window seat out of the shelves instead! So, with some 2X4's, a piece of foam batting and a few yards of coordinating fabric that matched the bedding, I had a window seat that completed the room perfectly (and cost effectively)!
 The rest of the rooms accessories were pieces found here and there. To keep with the Vintage feel of the room I had black and white photos of my hubby and his Dad framed to anchor both sides of the personalized motorcycle jersey. I had such a great time creating this room for my lil' one to come and hope you all enjoyed it too!
Smiles~
Amy
Cookies and Milk Baby Shower
October 13, 2010
When my family and friends approached me about having a baby shower, I have to admit I was hesitant at first. I thought I had everything I needed as far as the essentials, but because this time around I am having a boy, I went ahead and agreed to it. OH how the party planning wheels began to turn!!!! I am known to have a sweet tooth and this pregnancy definitely supported that habit!! So, I remember seeing an adorable "Cookies and Milk" themed Birthday party on the Internet and thought why not have a shower around this adorable theme AND support my love of my nightly cookies and milk before bed?
 With the help of family and friends I was truly blessed and was given one of the most adorable baby showers ever! Most of the details you see were hand made. The "A" on the front door was made by my talented sister, her amazing Cricuit, poster board and some Cookie Crisp cereal! My wonderful sister also made cookies on a stick that were made from Styrofoam, paint, wooden dowels, and some more Cookie Crisp cereal.
I wanted the colors of the shower to compliment my son's room (Pics to come). So we of course went with brown, whites and accented with orange. I love how the pop of orange made the whole table stand out. I asked my talented friend Donella of Ella B Photography to create a banner for me and she did not disappoint! "Got Cravings" was strung over the table with the complimenting colors of the shower and she even added little chocolate chip cookies on each letter.

I had also seen these blue and white paper straws on Bake It Pretty and knew they needed to be included in this shower. They were just too cute to pass up!
 Not only did my amazing friends and family make a variety of dozen upon dozen of delicious cookies for the table, Jamie of Kolby Kakes also made her famous cake balls in the coordinating colors of the shower. She is so creative! I also asked her if she could create a milk bottle and chocolate chip cookie sugar cookie for the day and she perfected my vision! The only bummer was that I did not get to sample one, they were gone instantly!
I wanted to limit the usual baby shower games, so my sister came up with "Guess How Many Cookies are in the Cookie Jar?" She simply filled a jar with (again) Cookie Crisp cereal and had each of the guests put their guess on a slip of paper with their name.


I knew I wanted each guest to leave with some sort of cookie to remind them of the day, but was not sure what I wanted to put them in other than a bag? I was so excited when I found these ADORABLE milk cartons from Polka Dot Prints! I contacted Jordan, the owner and she was able to compliment the colors and the theme perfectly onto these mini milk cartons that were then filled with mini chocolate chip cookies from Trader Joe's. Aren't they SO unique? Stay tuned and we may just have a lil' Giveaway in the future (tomorrow....wink, wink!!)????

Thank you everyone who had a hand in throwing me not just a shower but a day full of memories that will last forever! I am beyond thrilled and excited to Welcome Baby Ayden into this world in just a few more days.
Stay tuned for our Giveaway from Polka Dot Prints......
Smiles~
Amy
Amy
Spooktacular Craft and Game
October 1, 2010
October 1, 2010
We posted our first Halloween Play Date yesterday and were so excited to share it with all of you. We hope you enjoyed all our Savvy finds and fun touches we added to make the Play Date/Party "Spooktacular".


In each of our Play Dates we like to have a recipe, craft and story that is involved as well as coordinates with the theme. Since this was a Halloween themed Play Date, the possibilities for a fun and age appropriate craft were endless! So, we thought what better craft and tradition than decorating a pumpkin? We wanted to be Savvy on the idea of the craft. We thought if we incorporated some Velcro, felt, googly eyes and some glittery pom-poms, the kids would have a pumpkin they could play with all month long, changing the face of their pumpkin like a "Mr. Potato Head".


When Amy Locurto from Living Locurto posted these Free Printables, we knew we had to use them!!!! Amy, who we think is the 'Queen of all that is Savvy', used soup cans to decorate and transform an ordinary table into a swanky, Fall centerpiece that would dress up any event! We decided to instead use the printables as a game for the kids to play.


Here is what you will need for supplies:
Plastic pumpkins (we got ours from The Dollar Tree) or real ones
Paint (if your kiddo wants to make a more spooky pumpkin)
Googly Eyes (Dollar Tree)
Velcro (Dollar Tree)
Felt (JoAnnes)
Scissors
Glue
Pom-poms (Dollar Tree) or any other decorative pieces you may want to add
Pom-poms (Dollar Tree) or any other decorative pieces you may want to add
****** Depending on the age of your child and or the amount of kids participating, we went ahead and pre-cut the felt into various shapes and sizes to make the assembly a little bit easier.
The finished product and some Happy lil' Pumpkins!!!!

When Amy Locurto from Living Locurto posted these Free Printables, we knew we had to use them!!!! Amy, who we think is the 'Queen of all that is Savvy', used soup cans to decorate and transform an ordinary table into a swanky, Fall centerpiece that would dress up any event! We decided to instead use the printables as a game for the kids to play.

Using soup cans we covered them with the festive printables and made a cute "Toss the Eyeball" game for the kids to enjoy!!!!
 It was a Fun Day....for all who got to Play. We Even kept the ghosts Away.
 It was a Fun Day....for all who got to Play. We Even kept the ghosts Away.
Smiles~
Amy & Bri
Spooktacular Play Date
Spooktacular Play Date
September 30, 2010
BOO!!!! Did we scare you? Didn't think so. Welcome to our first Halloween "Spooktacular"
Play date. We wanted the day to be nothing less than fabulous for our kiddos and friends so greeting them at the front door was this adorable Anders Ruff "Boo!" sign (a free printable) that set the Halloween mood right away.


As soon as our ghoulish guests came inside we started our lunch time recipe. What do you get when you pair hot dogs and crescent rolls? A yummy "Mummy Dog" for a delicious hands on snack. We gave each child their own crescent dough triangle and a hot dog and let them "dress" their own Mummy Dog to their liking. As soon as their Mummies were wrapped we popped them in the oven and let the kiddos outside where we had set up the rest of the Halloween Spooktacular day for them to enjoy!


We of course used an amazing group of talented women to help pull this festive Play Date together. We found complimentary printables from Tweedle Dee Designs. The yummy Spooky Circles, Pumpkin Pops and Pumpkin cupcakes were provided by the wonderful Kolby Kakes. And the Savvy find that we think finished the table was the $3 bat garland that draped the front of the table from a local store here in CA called Tai Pan, every Savvy shoppers dream!!!!
 This Spooktacular Play Date could not have happened without a trip to our local Dollar Tree where we found glittery spiders, googly eyes and plastic pumpkins (See craft). A recipe, we still have yet to perfect, is our version of a healthy candy corn treat made out of fruit. (Post to follow) Our Glamorous giveaway this week, a hand painted chandelier canvas with rhinestone detail, comes from Canvas by Kerry which we used to decorate our drink table. Bake it Pretty gave us inspiration to use cupcake liners as popcorn holders for everyone to snack on while the Mummy Dogs were baking.
 So here is our kids version of Mummy Dogs. Yea, we know they are missing eyes and are halfway dressed, but that is the fun part right? Yet another Savvy find and FREE printable we found were these sweet candy corn cone holders from Skip to my Lou that we used as hangers filled with more popcorn.

We ended the Day with Kolby Kakes delicious Pumpkin Pops and a story. The kids intently listened to The Spooky Smells of Halloween A Scratch and Sniff Book by Mary Man-Kong. The kiddos loved the cute story and really enjoyed the Smells of the Spooky Season an Adorable Seasonal Read....

So the day was done. Their tummies were full and the craft was made. Ella B captured it all and even got the kiddos together for a group shot all dressed up in Sweet Things fashions and other homemade costumes. Aren't they too Cute??

Smiles,
Amy & Bri
Simple & Savvy Grandparents Day Project
Tuesday, September 7, 2010
Just a reminder.....Grandparents Day is September 12, 2010. We love to do handmade gifts for those we love! Here is an inexpensive but memorable gift to make for your Nana’s, Papa’s, Mimi’s, Grandpa's, Grandma’s. We visited the $1 Bin and stumbled upon frames and scrapbook paper and realized this would be the Perfect Gift!!!!
 You will need
 Mod Podge
Razor Blade
Ribbon (optional)
8x8 frame from Michael's- $1
Scrapbook Paper- 4/$1
Scrapbook Saying- $1.99
Total Cost of the Project if $3.52
Razor Blade
Ribbon (optional)
8x8 frame from Michael's- $1
Scrapbook Paper- 4/$1
Scrapbook Saying- $1.99
Total Cost of the Project if $3.52

Cut your paper to the frames size
Take a Razor Blade and cut out the inside Shape
Mod Podge the entire frame
Place the paper over the frame
Once positioned and glued down, Mod Podge over the top
Let dry over night, then position the Saying on the bottom
If you choose, you can attach ribbon onto the back to hang.
 This is a perfect gift for any occasion.....Savvy Crafting!!!!
Smiles,
Amy & Bri
School Starts...With a Welcome Basket
Friday, September 3, 2010
We made it through our kiddos first week of Preschool. Surprisingly there weren't too many tears, at least from our kids!!!! As Mommies we had a much harder time letting them go for the 3 whole hours they were away, but we survived.
We wanted to start the year off giving. So we put together a "Welcome Basket" for the 3 amigos to give their teachers. Of course we couldn't just put these useful items in a basket and give it as is. We needed to make it warm, friendly and sweet. How perfect was it that Kim from the TomKat Studio was offering adorable Back to School Printables in her Etsy shop. As Kim would say they made us Swoon!!!!

We included our baked Peanut Butter Cookies (which we baked with the kids of course) adding the adorable “ABC” idea we found for the back to School Touch. Then we packaged them in clear cello bags tied with ribbon and a fun little apple tag, it completed the sweetness of the basket.
 We chose to create a “Savvy” new look for a boring bottle of Sanitizer, a bottle of Soap and bag of wipes. We also used the note cards and wrapped them with ribbon for a fun way to add a little flair.
When purchasing these Printables we knew the possibilities were endless as to what we could do with them. When thinking ahead and being Savvy, another great way to make use of these TomKat printables could be when Teacher Appreciation week rolls around or you have a fun Apple Pie recipe you would like to share.
As we picked up our kiddos from school the other day, waiting in their cubby was a special note from their teachers

And that is what giving is all about!!!!
Smiles,
Amy & Bri
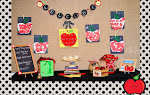
"Apple of my Eye" Back to School Play Date
Wednesday, September 1, 2010
Webster defines a play date as~an arranged appointment for children to get together for a few hours to play. While this is true, we wanted more…. Since every play date is a party!!!!

The Savvy Moms play date is one that is creative, interactive, educational, fun, healthy and delicious, all at the same time. With Back to School (or rather our kids 1st day of school) on our minds Apples were the perfect theme. We narrowed down the craft, the recipe, and a great story and were ready to add the Sass. With dessert tables all the rage these days (at least in our own little blogging world) we thought it would be perfect to have a table centered around our play date. A table that would mimic the Desserts of Amy Atlas, and the classy stylings of Martha Stewart; but all with our own Savvy Selections. These Savvy selections included a perfect canvas from Lucky Girl, Edible Creations from Kolby Kakes and adorable attire from Sweet Things. And of course capturing the details of our day; Ella B Photography.
Class....please be seated for your lesson on our First Savvy Moms Play Date!!!!

 Class is in session!!!! Let’s begin with art…a subject every child (and adult) loves. Especially when allowed to paint on one’s body without getting in trouble.

Apple Hand Prints are an easy and fun way to capture the memory of your little ones hand print while allowing them to get a little messy.

 Class is in session!!!! Let’s begin with art…a subject every child (and adult) loves. Especially when allowed to paint on one’s body without getting in trouble.
Apple Hand Prints are an easy and fun way to capture the memory of your little ones hand print while allowing them to get a little messy.
To complete the craft you will need the following:
Apple Template printed on cardstock . We cut off the stem.Red tissue paper cut into squares (or your child can tear the tissue in strips if they aren't yet using scissors)
Glue Sticks
Paint Brush
Green Washable Tempra Paint, so you don’t need to bust out the Shout
Black Construction paper
Chalk (Optional) for child to write their name
Step 1. Glue the cutout Apple Template to the Black Construction paper
Step 2. Encourage your child to glue the red squares onto their apple
Step 3. Paint the hand green (which leads to the desire to paint other things…so watch out)
Step 4. Press firmly onto the top of the Apple creating the stem


While the kids enjoyed their apple boats we thought it best to read a Book. And what better selection than The Giving Tree by Shel Silverstein. A classic story on the importance and reward of giving. Both of which are qualities we are instilling in our children.
 While we hoped that the days activities would be remembered....and that our monkeys would take away the educational and moral aspects of the play date, we were not at all surprised to find that in the end, the most memorable part of the day was the delicious Apple Pops created by Kolby Kakes. These ultimate cake pops were really the Apple of our Kids Eyes..
 Class is dismissed!!!
Smiles,
Amy & Bri
