Monday, February 28, 2011

A Savvy Celebration!!

February 28, 2011

We are so excited to announce that we will now be contributing writers for Celebrations.com!!

Celebrations.com is your destination for party ideas and party planning! Get expert advice from the most knowledgeable experts in the party planning industry including ideas for great decorations for you home, gifts and favors for your family and friends and fun crafts you can make with your children. And, you can share your own party ideas, recipes, photos and videos!


Photography by Racz Photography


As contributing writers we will get to share all our Savvy ideas, recipes, crafts and of course our Savvy Play Parties! We could not be more thrilled to work with such an amazing source for all your party planning needs and inspirations.

We just recently had our Rainbow Play Party and just got the word that it is up and running over at Celebrations.com! Check out our Color-filled day!


Smiles~

Amy & Bri

Saturday, February 26, 2011

S'mores Cupcake Ideas from Celebrations.com

February 26, 2011

S'mores Cupcake Ideas

Traditional s’mores recipes make especially sweet little cakes. Though they have only three flavors, the chocolate, marshmallow and graham crackers come together easily in cupcake form. We have an easy and delicious s’mores cupcake recipe for you to try plus a few additional ways to jazz them up. Great for family gatherings and camping birthday parties, the recipe is so quick, you can enjoy the sweet, gooey campfire treat anytime you want.


With only three ingredients making up traditional s'mores, it's easy to put them all together to create one delicious cupcake.

Ingredients

  • 10 whole graham crackers, crushed
  • 2 tablespoon butter, melted
  • chocolate cake recipe
  • 7 oz marshmallow crème
  • 2 tablespoons confectioner's sugar
  • 2 Hershey’s chocolate bars

Directions

  1. Put paper liners in a 24 count cupcake pan.
  2. In a small bowl, mix crushed graham crackers with melted butter.
  3. Put approximately 1 tablespoon of graham cracker mixture in each cupcake liner.
  4. Mix your favorite – or easiest chocolate cake recipe – and fill cupcake pan ¾ full.
  5. Bake according to cake recipe directions.
  6. Let cupcakes cool completely.
  7. While cupcakes cool, stir confectioner’s sugar in marshmallow crème.
  8. Frost each cupcake with the marshmallow frosting. The frosting will run over the sides to look like melted marshmallows in a traditional s'more.
  9. Sprinkle any leftover graham cracker crumbs over cupcakes and top with one square of the Hershey’s chocolate bar.

Serves

24

As if the little cakes aren't special enough, you can always top them off with these creative cupcake topper ideas.

  • Dip a jumbo marshmallow in melted chocolate and graham cracker crumbs. Place on one end of a toothpick and stick into each cupcake.
  • If kids will be enjoying the cupcakes, makemarshmallow animals to go on top.
  • Make easy custom picks using scrapbook paper. Take a small square of tan paper and glue a smaller square of dark brown paper on top. Cut a piece of white paper to have a wavy border and glue on top of the brown pieces. Fill in with any phrase or word you like.

Shake up tradition with these unique changes to a simple s'mores cupcake recipe.

  • For similar flavor plus the surprise of color, substitute red velvet cake for the chocolate.
  • Or, switch the cake and frosting flavors. Bake a vanilla cake and frost with chocolate icing topped with actual toasted marshmallows.
  • Use chocolate graham crackers for an extra chocolate-y taste.
  • Fill cupcakes with chocolate fudge or marshmallow cream using a specialty cake decorating tip.
  • Experiment with different flavors added into the frosting by mixing in peanut butter, almond extract or instant coffee granules.


For more party ideas, tips, and inspiration, check out Celebrations.com!

Smiles~
Amy & Bri

Wednesday, February 23, 2011

Savvy and Lucky Finds

February 25, 2011

Top O' the Mornin' to you all!!!! This Friday feature is inspired by all things GREEN, just in time for St. Patrick's Day! Enjoy!
Felt Floral pillows are a huge trend right now and look so easy to make. This Green felt flower pillow tutorial found over at I Share Crafts has us Green with Envy!


We found this fun and festive wreath tutorial over at My Frugal Family. The best part was the Savvy cost to make it, $3.75!!! It just might be your LUCKY day if you can score the same deals to make this wreath!

This traditional St. Patty's Day Beef Stew recipe is the perfect way to take the chill off these last weeks of Winter
Images from Woman's day.com
With Girl Scout Cookie season upon us (Woo-hoo!!) this Frozen Thin Mint Grasshopper Pie is the perfect dessert for those of you seeing GREEN

Images from Woman's Day.com

Amazing Moms has this great St. Patty's Day recipe and craft.
You can download this Lerechaun Cupcake Wrapper Here


We just love The Twisty Noodle.com for those moments when your kiddos need a little something to pass the time! Here are some fun coloring pages for your little one to add a touch of the rainbow to.


How Lucky are You to get these cupcake circle toppers from The TomKat Studio......FREE!!!


These Subway Art posters that The Girls at eighteen25 create for the holidays always Cheer us up!! Download yours here and put it in a frame for a bit O' Luck!


'For each Petal on the Shamrock this brings a wish your way-
Good Health, Good Luck, and Happiness for Today and for Every Day!!!'
-Author Unknown


Smiles~
Amy & Bri

sarah + abraham Olliegraphic Pillow Giveaway

February 23, 2011
Congratulations Sarah Corrigan. You are the winner of the sarah & abraham Pillow.
Please be sure to email us within 7 days with your contact information.
We would love to see the Pillow once you get it!!!

Have you heard of sarah + abraham .....

If not we are thrilled to share this Delightful Shop with you.

We have loved all things sarah + abraham for quite some time.

Actually we really can't remember when we didn't fall for their Designs and Creations.

sarah + abraham is an online shop specializing in personalized children's stationery and art prints. Incorporating illustrations from several talented artists, our unique products feature a clean and simple style, combining vintage with modern to evoke an innocent, nostalgic feeling.

Whether you are shopping for a gift, planning a party, or stocking up for your own stationary and correspondence needs sarah + abraham will have what you need. And really want.


The possibilities are endless! These versatile silhouettes can be mixed and matched in just about any way you can think of. Choose the silhouettes that best portray your family, and sarah + abraham create personalized stationery for you!

Sarah started the business in 2007 and has continued to grow her collections based on her customers feedback. Sarah says "I love helping customers create the perfect paper goods for their parties, gifts, and social correspondence. It's such a treat to be part of welcoming a new baby, decorating a nursery, planning a child's birthday party, or teaching children the value of a hand-written thank you note".


Every piece from sarah + abraham has that attention to detail and love Sarah speaks of.


We are so Excited that sarah + abraham is now offering personalized pillows! These ADORABLE custom pillows feature hand-sewn interpretations of the popular olliegraphic line and are completely handmade starting with an upholstery weight fabric for the pillow cover and finished with muslin, felt, and hand-embroidered details.

Picture by C. Davis Photography

They're sure to be a big hit with any little girl or boy while adding a truly unique finishing touch to their bedroom or nursery. They come in seven beautiful fabric colors to choose from and of course all of the olliegraphic options to make this custom item look just like your little one!

And because we LOVE you!

Because we think sarah + abraham are FABULOUS

And because we know you will too.....

We are giving away a "New" sarah + abraham Olliegraphic Pillow.

Enter to Win By~

1) Following sarah + abraham on facebook, and come back to let us know you are a fan!

2) Visit sarah + abraham and tell us your favorite product (it will be hard to choose)

2) Subscribe to Follow our Blog (on the left hand side)!


3) Become a fan of The Savvy Moms Guide on Facebook, and come back to let us know you are a fan here!


4) Follow The Savvy Moms Guide on Twitter, come back and let us know your following our tweets here!


5) Share this Giveaway with your friends and family. Share where you did your Shout-out here!


Winner will be chosen on Wednesday March 2, 2011 at 8:00pm (PST). Any entries received after this time will not be considered. Open to US only. Winner needs to contact with their shipping address and the personalization details
within one week of the end of the giveaway. Winner will be chosen using random.org. This is a sponsored post for The Savvy Moms Guide.

Smiles~

Amy & Bri

A Little Wellies Cutie Patootie Onesie Dress and Tutorial

February 24, 2011


All we can say is that we Adore Little Wellies. Christina is one of those designers that ALWAYS gets it right. The fabric selections, the colors, designs and fit. We were so excited when she agreed to come and share some of her Savvy with all of you. We are certain that you will be smitten with Christina and her Little Wellies designs just like we are.

Without further Ado.....


hello from Little Wellies :)


i am soo pleased to be guest blogging for these savvy girls over here, and so excited to share this new diy: cutie patootie onesie dress with you (i'll soon be doing an upload of this style in my shop!). i like how you can take any onesie (that normally gets paired with boring pants) and make it into this fabulous dress. some gals like to cut the onesie in half, but i leave the onesie whole so my little bridgett's diaper isn't hanging out.


it's super simple. all you have to know is a straight stitch & a gather stitch. and if you don't, there is always youtube :) i love this style, because you can mix it up, funk it up, sparkle it up however you like. i'd love to do a bunch of sports ones for all my ny giant fans, a soft palette for easter with tons of ruffles, a snuggly fleece one for bedtime, oh i could just go on and on.. so anyway, lets get to it...


first cut your fabric (we'll just call each fabric by what it looks like

to try to make this diy simpler!) you'll need:

orange flowers fabric: 3" x 29" strip

pink chevron: the length of your onesie x 21"

see in picture below how i used my onesie as a guide

purple circles: 2" x strip the width of your onesie + 1"

gather stitch your orange flower fabric & pin right sides together to the pink chevron.


sew the right sides together, then zig zag the raw edges to finish them. flip it right side out & top stitch.

gather stitch the top of the pink chevron, then pin it where you want it to your onesie. make sure to not pin the front side to the back side. sew it to the onesie (hint: stretch the onesie as you are sewing the dress on, so that the dress is more roomy and not too tight).


flip the dress inside out, and sew up the sides (don't forget to zig zag the raw edges together).


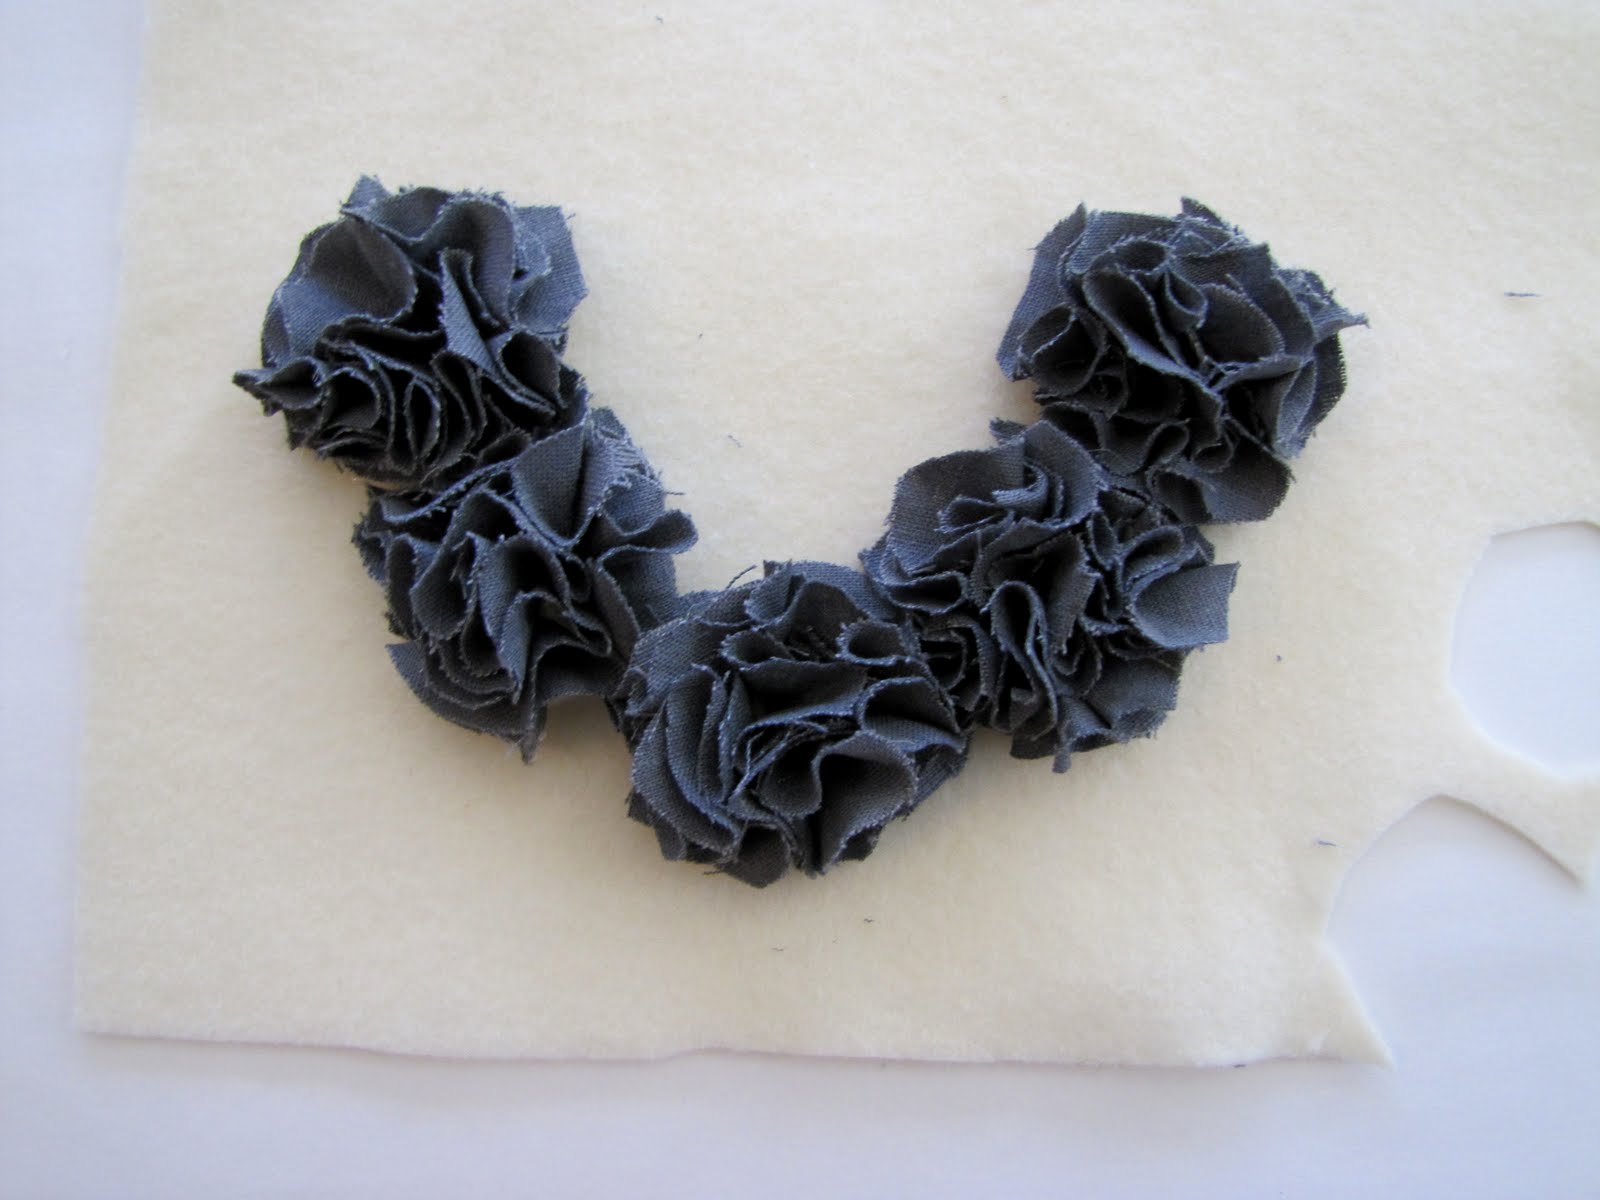
after pressing your purple circle fabric strip, pin it over the gathered seam of the pink chevron.

finish the edge by folding in the end of the strip & backstitching over the two edges.


hem the bottom of the dress however you would like.

add a cute miss monster beanie & some baby legs..


and viola [!] cutie patootie onesie dress :)


thank you so much for reading along. i'd love to see your style, so if you feel so inclined please share photos with us over at Little Wellies on facebook!


Tuesday, February 22, 2011

Seasonal Consignment Events: A New Savvy Trend!

We are thrilled to have our Friends Carrie and Jacey, the organizers of Moo LaLa Boutique, stopping by the Blog today.

These friends, and neighbors, are taking a 'Savvy' approach to shopping and saving.

How??

Consignment.....

Are you familiar with Consignment Sales? If not you will be addicted (we are) to the benefits Carrie and Jacey Share.

Take it away ladies~

A new concept in shopping is helping families stay within budgets when it comes to outfitting their children. Families once priced out of the name brand markets, are now able to purchase name brand clothing and baby gear for a fraction of the retail price. Seasonal consignment events are a new trend spreading across the nation as consumers learn about all the advantages of selling and shopping at them. So what is a seasonal consignment event? A consignment event is typically a sale that lasts 1 day to 1 week, allowing consignors to bring their outgrown children’s items to sell profiting up to 75% of their sales, and providing amazing deals to shoppers by taking advantage of the gently-used price. A benefit to all that are involved!

So why shop consignment? Clothing prices are expected to rise about 10 percent in coming months, with the biggest increases in the second half of the year Seasonal consignment sale shoppers receive steep discounts on name brand clothing, toys and baby gear, leaving more money in your pocket, avoiding the inflating costs of new clothes. You can typically expect to pay 30-40% of the original retail price. Most sales have a thorough inspection process to maintain the highest quality of items, making sure that you get the most for you money.

What are the advantages of selling at a seasonal consignment event? Consignors typically receive a larger percentage of the profit of their sold items as compared to a consignment store. Since these are highly advertised events and there are more shoppers passing through making it easier to sell items in a short amount of time, which translates to a quicker profit for the seller! Additionally, there is none of the hassle that comes with advertising and holding a garage sale and you are able to price your items at a higher price point than what you can expect at a garage sale.

What happens to the clothes that don’t sell? Typically, consignors have two options when it comes to their unsold items, they can pick them up or have them donated to a local charity that is arranged through the sale organizers. Since your closets are already cleaned out, this option is a great way to keep the clutter out and benefit others in the community.

So are you excited to shop at a seasonal consignment sale? You can visit Consignment Mommies to search for a sale in your area. Get ready to become addicted and save some MOOLAH!


SELL gently used items, SHOP for amazing deals, SAVE lots of MOOLAH!

Local ladies stop by Moo La La Boutique Children’s Consignment Event in Redlands, Ca March 11-13 2011.


Smiles~

Amy & Bri

Friday, February 18, 2011

{Feature Friday} Pom Pom Bib Necklace by Little Miss Momma

When we saw this Necklace we knew we had to make it our Friday Feature!

We often find ourselves lost in any and all things Little Miss Momma creates but this is our all time Favorite LMM Creation!

Why???
Well it is Simple, Stylish, Chic, Fun, and Super Savvy.
So here it is straight from Little Miss Momma The Necklace (with tutorial) we couldn't get off our minds. Really we dreamt about making them

POM POM BIB NECKLACE TUTORIAL {LMM FINALLY GETS HER CRAFT ON}

Tuesday, December 7, 2010
{ totally anthro-esk}
Do you remember my Pom Pom headband tutorial a while back?
It was kinda a big deal {hehe}.
So, after a craft fest with my girl Brittany, I was inspired to turn those Pom's into an anthropologie inspired necklace. Brittany used this similar process to create a Pom Pom brooch.


These are crazy easy to make!


Supplies:
Felt {approx 1 sq foot}
Cotton fabric in the color of your choice
Fabric scissors
Necklace chain, pearls, etc. {I ended up using a different chain than the one pictured}
Hot Glue gun


First, cut out 5 small 1-1.5 inch felt circles.


Now cut out bunches and bunches of fabric circles {same size as the felt circles}. I use the felt circles as a template for the fabric circles. And to save time, I stacked my fabric and cut out about 8 circles at a time. Don't worry if the circles aren't perfect--it won't make a bit of difference.


Now, we are ready to make the pom poms.


Take one of the fabric circles and scrunch it from the center.
Feel free to reference the Pom Pom headband tutorial if you need to.


Apply a drop of glue to the bottom of the scrunched fabric circle and place in the middle of the felt. Continue this process until you have covered the entire felt circle with scrunched fabric circles. Then repeat that process on the remaining felt circles until you have 5 mini pom poms.


Place pom pom's on top of the remaining felt in the arrangement you want your necklace.


Glue down each pom pom {except the top two}.


Here is the chain I ended up using. I bought it at Michael's.


Glue the ends of the chain onto the last two pom poms.


I glued the chain about an inch down the pom so that it's extra sturdy.


Then glue down your last two poms onto the felt.


Now trim the felt around the pom poms until you're left with only the necklace.


I think I will make one in every color.


Happy Crafting!
Don't you just love her???
Well we do.
And we are super excited to meet her next month at Bloogy Bootcamp in San Diego.
Smiles~
Amy & Bri